One of our servers started beeping very loudly and disturbing the people working in the same room. What happened? It turns out that the RAID device was beeping due to a failed hard drive. In this post, we will walk through all the steps to find evidence of the disk failure, identify the drive, replace it, and rebuild the array.
Confirm that we have a failed drive #
We can inspect the messages in the syslog to look for evidence that a disk failed.
Here, we show that one drive has 320 unreadable sectors:
sudo cat /var/log/syslog | grep unreadable
Feb  7 10:32:51 bcb-comp smartd[2596]: Device: /dev/bus/0 [megaraid_disk_13]
[SAT], 320 Currently unreadable (pending) sectors (changed +256)
My understanding (after reading a few articles online) is that a few bad
sectors is not necessarily a reason to replace the drive. However, if the
number of sectors is increasing over time (e.g. changed +256 in the message
above), then the drive might fail soon.
Get information about our system #
What RAID controller do we have? We need this information to get the right version of storcli.
lspci -nnk | grep -i raid -A4
3b:00.0 RAID bus controller [0104]: LSI Logic / Symbios Logic MegaRAID SAS-3 3108 [Invader] [1000:005d] (rev 02)
        Subsystem: LSI Logic / Symbios Logic MegaRAID SAS 9361-8i [1000:9361]
        Kernel driver in use: megaraid_sas
        Kernel modules: megaraid_sas
Install storcli #
We need to know which RAID controller we have, and then get the appropriate version of storcli for that RAID controller.
If someone already installed it on our system, we might find it here:
/opt/MegaRAID/storcli/storcli64
If we cannot find the utility, then we should download a new one and install it.
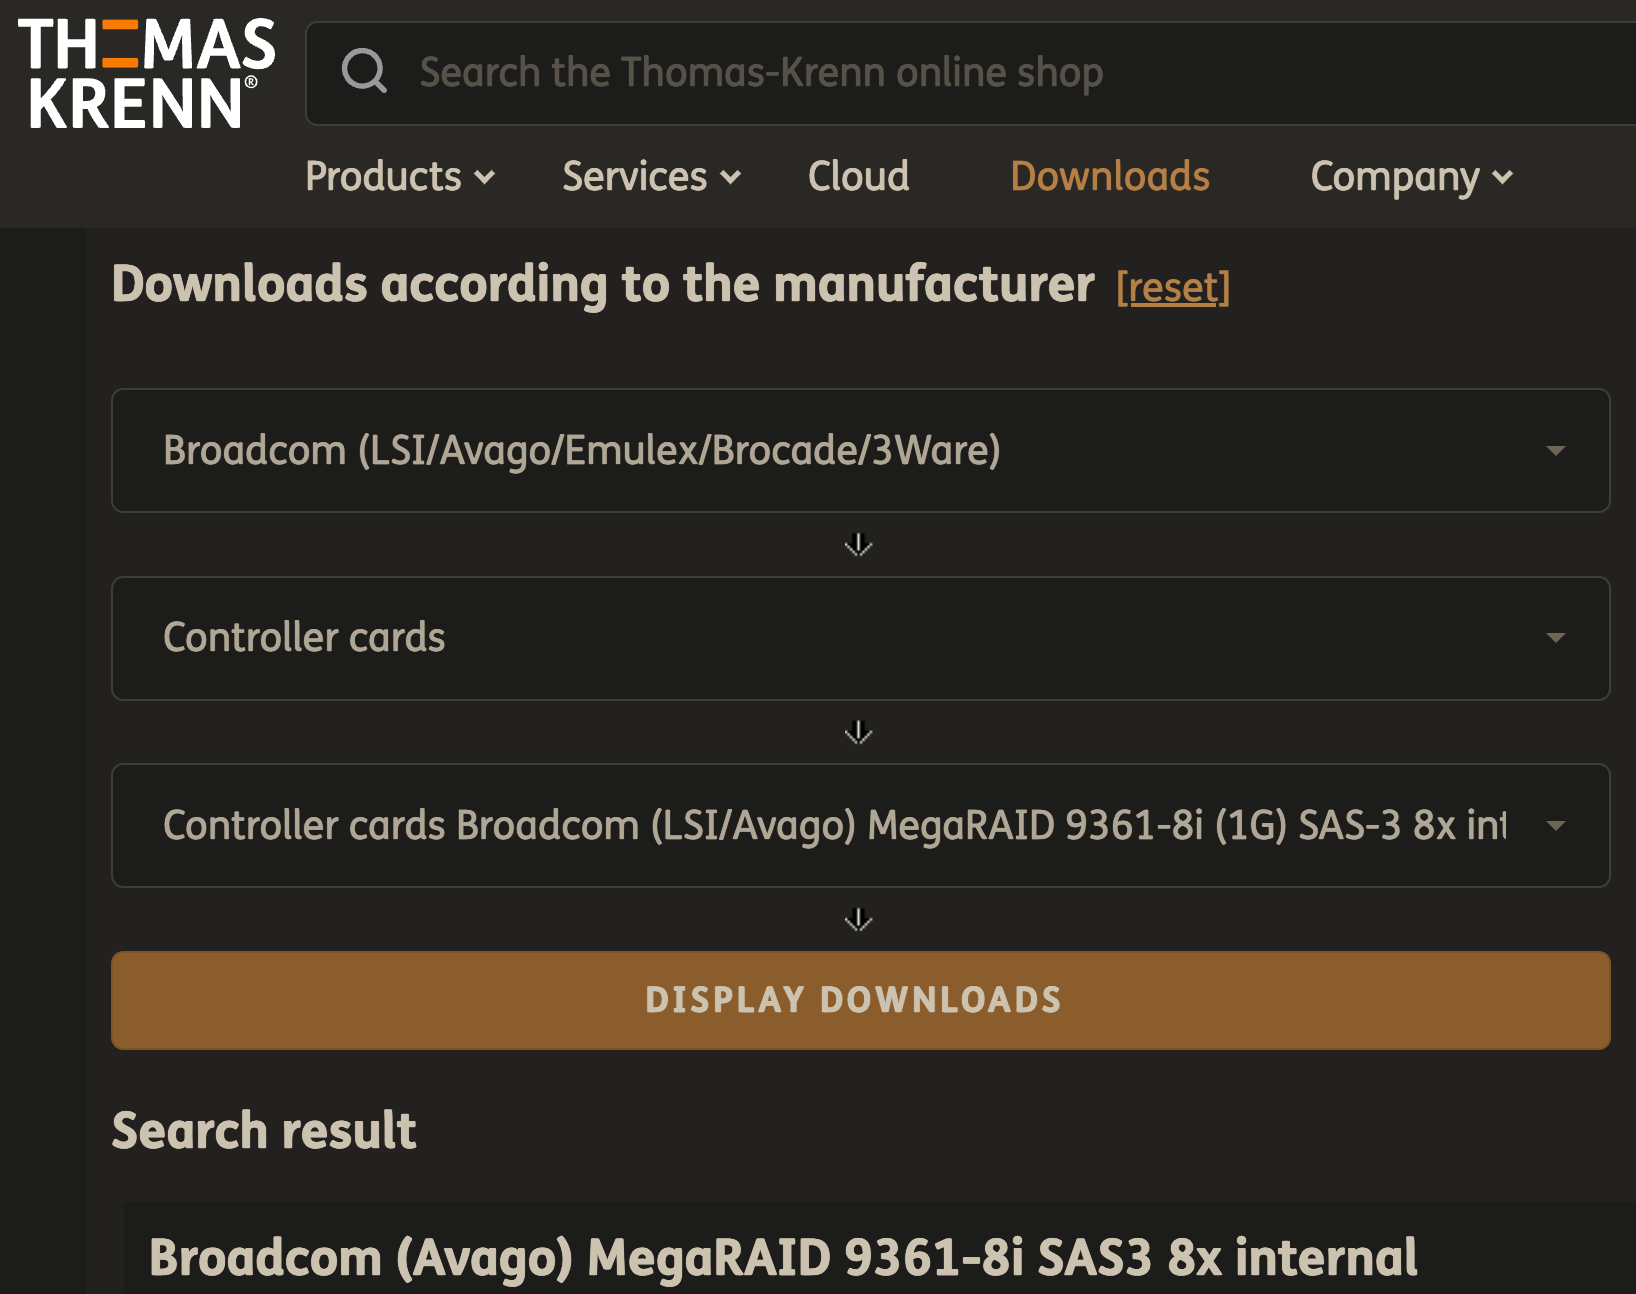
Let’s go to Thomas Krenn to find the appropriate download for our controller (MegaRAID 9361-8i):
This is the option we should select:
Controller cards Broadcom (LSI/Avago) MegaRAID 9361-8i (1G) SAS-3 8x internal
Next, click “Display Downloads”.
Here is a screenshot of the page with the correct option selected:
Then scroll down to Broadcom Unified StorCLI and download the zip file. Open it and find the Ubuntu folder and the deb file inside.
Then use dpkg -i storcli_*.deb to install it.
Now we should have the command line utility, check that it runs and produces the output you expect:
sudo /opt/MegaRAID/storcli/storcli64 /c0 show all
On the web we can find information that mentions “MegaCLI” and “StorCLI”, but I think we should be using “StorCLI” due to this quote from intel.com:
CmdTool2 was the original utility and supported all controllers until around 2013. CmdTool2 was formerly known as MegaCLI.
StorCLI was introduced around the same time as the Intel® RAID Controller RS2BL080, and it’s the preferred utility for RAID Products from 2013 and later.
Some blog posts suggest that we can use either tool, but storcli works so that’s what we use here.
Display RAID array and drive information with storcli #
The storcli utility has a lot of commands to get and set different configuration settings.
Here is a forum post from that describes all the different commands we can run with storcli:
For example, we can show all of the information for our RAID with this command:
sudo /opt/MegaRAID/storcli/storcli64 /c0 show
The output is too long to post here in full, so we’ll just highlight a few items.
First, the topology of our degraded array:
TOPOLOGY :
========

-----------------------------------------------------------------------------
DG Arr Row EID:Slot DID Type   State BT      Size PDC  PI SED DS3  FSpace TR
-----------------------------------------------------------------------------
 0 -   -   -        -   RAID10 Dgrd  N  43.654 TB dflt N  N   dflt N      N
 0 0   -   -        -   RAID1  Dgrd  N  10.913 TB dflt N  N   dflt N      N
 0 0   0   252:0    13  DRIVE  Rbld  Y  10.913 TB dflt N  N   dflt -      N
 0 0   1   252:1    8   DRIVE  Onln  N  10.913 TB dflt N  N   dflt -      N
 0 1   -   -        -   RAID1  Dgrd  N  10.913 TB dflt N  N   dflt N      N
 0 1   0   252:2    9   DRIVE  Onln  N  10.913 TB dflt N  N   dflt -      N
 0 1   1   252:3    14  DRIVE  Onln  N  10.913 TB dflt N  N   dflt -      N
 0 2   -   -        -   RAID1  Dgrd  N  10.913 TB dflt N  N   dflt N      N
 0 2   0   252:4    15  DRIVE  Onln  N  10.913 TB dflt N  N   dflt -      N
 0 2   1   252:5    10  DRIVE  Onln  N  10.913 TB dflt N  N   dflt -      N
 0 3   -   -        -   RAID1  Dgrd  N  10.913 TB dflt N  N   dflt N      N
 0 3   0   252:6    11  DRIVE  Onln  N  10.913 TB dflt N  N   dflt -      N
 0 3   1   252:7    12  DRIVE  Onln  N  10.913 TB dflt N  N   dflt -      N
-----------------------------------------------------------------------------

DG=Disk Group Index|Arr=Array Index|Row=Row Index|EID=Enclosure Device ID
DID=Device ID|Type=Drive Type|Onln=Online|Rbld=Rebuild|Optl=Optimal|Dgrd=Degraded
Pdgd=Partially degraded|Offln=Offline|BT=Background Task Active
PDC=PD Cache|PI=Protection Info|SED=Self Encrypting Drive|Frgn=Foreign
DS3=Dimmer Switch 3|dflt=Default|Msng=Missing|FSpace=Free Space Present
TR=Transport Ready
Notice that we have Dgrd (Degraded) status for Array 0 and Rbld
(Rebuilding) status for Drive 13:
 0 0   -   -        -   RAID1  Dgrd  N  10.913 TB dflt N  N   dflt N      N
 0 0   0   252:0    13  DRIVE  Rbld  Y  10.913 TB dflt N  N   dflt -      N
My understanding is that this is the expected status when one drive in the array is not working correctly. The array is still usable, but it has degraded performance.
Next, let’s look at the storcli output describing the physical drives:
Physical Drives = 8

PD LIST :
=======

---------------------------------------------------------------------------------
EID:Slt DID State DG      Size Intf Med SED PI SeSz Model                Sp Type
---------------------------------------------------------------------------------
252:0    13 Rbld   0 10.913 TB SATA HDD N   N  512B HGST HUH721212ALE604 U  -
252:1     8 Onln   0 10.913 TB SATA HDD N   N  512B HGST HUH721212ALE604 U  -
252:2     9 Onln   0 10.913 TB SATA HDD N   N  512B HGST HUH721212ALE604 U  -
252:3    14 Onln   0 10.913 TB SATA HDD N   N  512B HGST HUH721212ALE604 U  -
252:4    15 Onln   0 10.913 TB SATA HDD N   N  512B HGST HUH721212ALE604 U  -
252:5    10 Onln   0 10.913 TB SATA HDD N   N  512B HGST HUH721212ALE604 U  -
252:6    11 Onln   0 10.913 TB SATA HDD N   N  512B HGST HUH721212ALE604 U  -
252:7    12 Onln   0 10.913 TB SATA HDD N   N  512B HGST HUH721212ALE604 U  -
---------------------------------------------------------------------------------

EID=Enclosure Device ID|Slt=Slot No|DID=Device ID|DG=DriveGroup
DHS=Dedicated Hot Spare|UGood=Unconfigured Good|GHS=Global Hotspare
UBad=Unconfigured Bad|Sntze=Sanitize|Onln=Online|Offln=Offline|Intf=Interface
Med=Media Type|SED=Self Encryptive Drive|PI=Protection Info
SeSz=Sector Size|Sp=Spun|U=Up|D=Down|T=Transition|F=Foreign
UGUnsp=UGood Unsupported|UGShld=UGood shielded|HSPShld=Hotspare shielded
CFShld=Configured shielded|Cpybck=CopyBack|CBShld=Copyback Shielded
UBUnsp=UBad Unsupported|Rbld=Rebuild
Notice that Drive 13 is Rebuilding (State=Rbld):
252:0 13 Rbld 0 10.913 TB SATA HDD N N 512B HGST HUH721212ALE604 U -
We need to pay careful attention to the numbers in the table above that correspond to Drive 13:
/c0is Controller 0/e252is Enclosure 252/s0is Slot 0
We can check on the rebuild progress for this drive:
sudo /opt/MegaRAID/storcli/storcli64 /c0/e252/s0 show rebuild
------------------------------------------------------
Drive-ID    Progress% Status      Estimated Time Left
------------------------------------------------------
/c0/e252/s0        11 In progress 12 Hours 54 Minutes
------------------------------------------------------
Buy a new drive #
Now that we know one of the drive has bad sectors, we can search the model number (shown above in the storcli outputs) to find a replacement.
Model number: HUH721212ALE604
Here it is on amazon:

Locate the failed drive #
We can find the serial number (SN) of our failed drive with this command:
sudo /opt/MegaRAID/storcli/storcli64 /c0/e252/s0 show all
Drive /c0/e252/s0 Device attributes :
===================================
SN = 5QK6PM9B
Manufacturer Id = ATA
Model Number = HGST HUH721212ALE604
NAND Vendor = NA
WWN = 5000CCA2B0ED51E8
Firmware Revision = LEGNW9G0
Raw size = 10.914 TB [0x575000000 Sectors]
Coerced size = 10.913 TB [0x574f00000 Sectors]
Non Coerced size = 10.913 TB [0x574f00000 Sectors]
Device Speed = 6.0Gb/s
Link Speed = 6.0Gb/s
NCQ setting = Enabled
Write Cache = N/A
Logical Sector Size = 512B
Physical Sector Size = 4 KB
Connector Name = Port 0 - 3 x1
Write down the SN (5QK6PM9B) on a sheet of paper and take it to the server
room. Then, we can find the matching drive inside the server.
Replace the failed drive #
Before we remove the drive, we should turn it off.
These instructions are copied directly from 45drives.com:
1. Set the failed drive as Offline –> `./storcli64 /cx/ey/sz set offline`

        x = Controller number

        y = Enclosure Device ID (Seen above as EID)

        z = Controller defined slot number

2. Set the failed drive as Missing –> `./storcli64 /cx/ey/sz set missing`

3. Spindown the failed drive –> `./storcli64 /cx/eall/sy spindown`

4. Remove the failed drive and replace it with a new drive (same model)

5. The rebuild should start automatically (If configured) and can be monitored
   –> `./storcli64 /cx/eall/sall show rebuild`

If auto rebuild isn’t turned on –> `./storcli64 /cx/ey/sz insert dg=0 array=0
row=0` (dg, array, row correspond to the Topology table from `./storcli64 /cx
show all`) Then start the rebuild manually –> `./storcli64 /cx/ey/sz start
rebuild` (Topology table will have state `Rbld` for that drive)

Aside:
One can increase the rebuild rate, as its default is set to 30%, but increasing
this will decrease I/O performance. `./storcli64 /cx set rebuildrate=A` (A =
Number ranging from 0-100.)
Also consider visiting this link for a detailed walkthrough.
Silence the alarm #
While the RAID is rebuilding, it might be nice to silence the alarm temporarily, so others in the room are not disturbed by the beeping noises.
Silence the alarm:
sudo /opt/MegaRAID/storcli/storcli64 /c0 set alarm=silence
Later, remember to turn it back on:
sudo /opt/MegaRAID/storcli/storcli64 /c0 set alarm=on
Confirm the array is back to normal #
Rebuilding happens automatically after the drive is replaced. We can check the rebuilding progress with this command:
sudo /opt/MegaRAID/storcli/storcli64 /c0/e252/s0 show rebuild
After rebuilding is complete, we can check to see that storcli output looks as expected:
sudo /opt/MegaRAID/storcli/storcli64 /c0 show
The output is too long, so I’m showing just a few highlights.
First, let’s look at the topology:
TOPOLOGY :
========

-----------------------------------------------------------------------------
DG Arr Row EID:Slot DID Type   State BT      Size PDC  PI SED DS3  FSpace TR
-----------------------------------------------------------------------------
 0 -   -   -        -   RAID10 Optl  N  43.654 TB dflt N  N   dflt N      N
 0 0   -   -        -   RAID1  Optl  N  10.913 TB dflt N  N   dflt N      N
 0 0   0   252:0    13  DRIVE  Onln  N  10.913 TB dflt N  N   dflt -      N
 0 0   1   252:1    8   DRIVE  Onln  N  10.913 TB dflt N  N   dflt -      N
 0 1   -   -        -   RAID1  Optl  N  10.913 TB dflt N  N   dflt N      N
 0 1   0   252:2    9   DRIVE  Onln  N  10.913 TB dflt N  N   dflt -      N
 0 1   1   252:3    14  DRIVE  Onln  N  10.913 TB dflt N  N   dflt -      N
 0 2   -   -        -   RAID1  Optl  N  10.913 TB dflt N  N   dflt N      N
 0 2   0   252:4    15  DRIVE  Onln  N  10.913 TB dflt N  N   dflt -      N
 0 2   1   252:5    10  DRIVE  Onln  N  10.913 TB dflt N  N   dflt -      N
 0 3   -   -        -   RAID1  Optl  N  10.913 TB dflt N  N   dflt N      N
 0 3   0   252:6    11  DRIVE  Onln  N  10.913 TB dflt N  N   dflt -      N
 0 3   1   252:7    12  DRIVE  Onln  N  10.913 TB dflt N  N   dflt -      N
-----------------------------------------------------------------------------
Notice that Drive 13 now has status Onln (Online), which is good:
0 0 0 252:0 13 DRIVE Onln N 10.913 TB dflt N N dflt - N
Second, the drives look OK:
---------------------------------------------------------------------------------
EID:Slt DID State DG      Size Intf Med SED PI SeSz Model                Sp Type
---------------------------------------------------------------------------------
252:0    13 Onln   0 10.913 TB SATA HDD N   N  512B HGST HUH721212ALE604 U  -
252:1     8 Onln   0 10.913 TB SATA HDD N   N  512B HGST HUH721212ALE604 U  -
252:2     9 Onln   0 10.913 TB SATA HDD N   N  512B HGST HUH721212ALE604 U  -
252:3    14 Onln   0 10.913 TB SATA HDD N   N  512B HGST HUH721212ALE604 U  -
252:4    15 Onln   0 10.913 TB SATA HDD N   N  512B HGST HUH721212ALE604 U  -
252:5    10 Onln   0 10.913 TB SATA HDD N   N  512B HGST HUH721212ALE604 U  -
252:6    11 Onln   0 10.913 TB SATA HDD N   N  512B HGST HUH721212ALE604 U  -
252:7    12 Onln   0 10.913 TB SATA HDD N   N  512B HGST HUH721212ALE604 U  -
---------------------------------------------------------------------------------
Looks like we’re all set and good to go. Ready for the next drive to fail. 👍
Good luck with your RAID!
Acknowledgments #
I want to sincerely thank Neal Smith, my friend and coworker at MGH. He noticed the problem, we talked about it, and then we figured out how to solve it together in a few hours. I am working remotely, so Neal did all of the hands-on work on the server on site.
Reply by Email